Episode 280: HubSpot Lists Best Practices (for Building Marketing Campaigns)
Welcome to HubShots Episode 280: HubSpot Lists Best Practices (for Building Marketing Campaigns) The Ultimate Guide to using HubSpot Lists This...
This edition we dive into:
You can watch this episode on our YouTube channel (or just listen to it on our YouTube audio channel)
Be an early subscriber to our YouTube channel.
We’re also available on Spotify or Soundcloud if that’s easier for you.
Did a colleague forward this episode to you? Sign up here to get yours every Friday.
Please forward this on to your work colleagues.
Recorded: Wednesday 18 May 2022 | Published: Friday 20 May 2022
On one hand forms are a simple concept, and easy to get started. On the other hand, they have a number of features that can get overwhelming at times.
In our previous episode - Building a Campaign in HubSpot from Start to Finish - we gave an overview of all the key components in a marketing campaign from start to finish.
In this episode (and future episodes) we’re going to dive into each of the key components in more detail.
As a quick recap, here’s the HubSpot items we covered at a high level last episode:
This week we’re looking specifically at HubSpot forms, and diving into the best practices around using each of the various form types in HubSpot, to drive better results for your business.
We’ll look at:
As part of this we’ll also discuss:
And we’ll use real world examples to show what we’ve learned over the years (including our mistakes).
By the end of this episode you’ll know which forms to choose and build, and the best practices for ensuring they give you maximum results.
Who said forms were boring? Not me!

Let’s get started…
There’s two main types of forms:
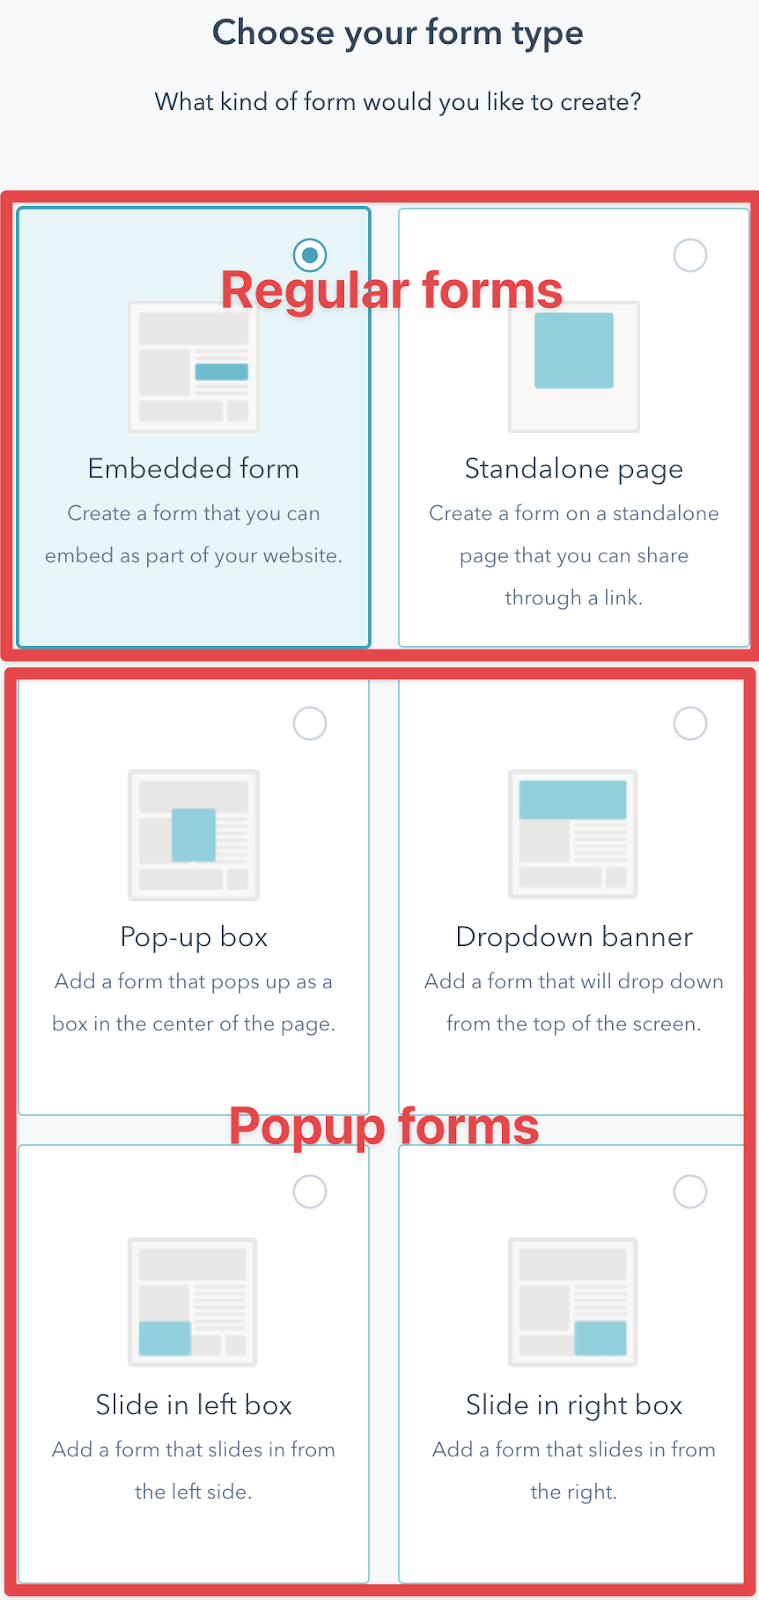
There’s also other form types, including:
By regular forms, we are referring to the first two options in the Create form process:
When creating forms you have the ability to mark fields as mandatory (otherwise, by default they are optional). Email address is the only field that is always mandatory.
The question as to whether a field should be mandatory or not depends on how qualified you want the form submission to be.
This in turn usually depends on what the focus is:
If the form is for a simple top of the funnel asset that is going to be mass promoted, and is mostly focussed on building a subscriber base then the simpler the form the better.
However, if the form is only for qualified contacts, and it’s aimed at weeding out tire kickers, then more mandatory fields are appropriate.
Examples of fields that when marked mandatory will reduce the submissions and result in more qualified contacts:
An example of a simple form is our HubShots Show Notes form - it only has:
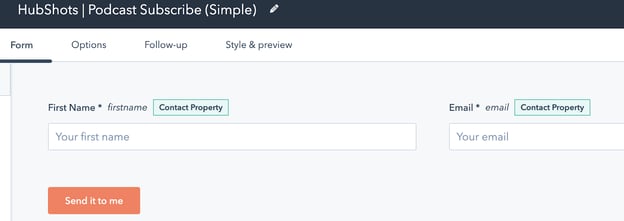
Whereas our HubSpot Coaching form includes fields for:
Progressive form fields allow you to keep forms ‘simpler’ and switch in new fields to replace fields that have already been entered.
Start by adding a progressive field onto your form - here’s an example of a simple contact us form, which has Company name as a progressive field:
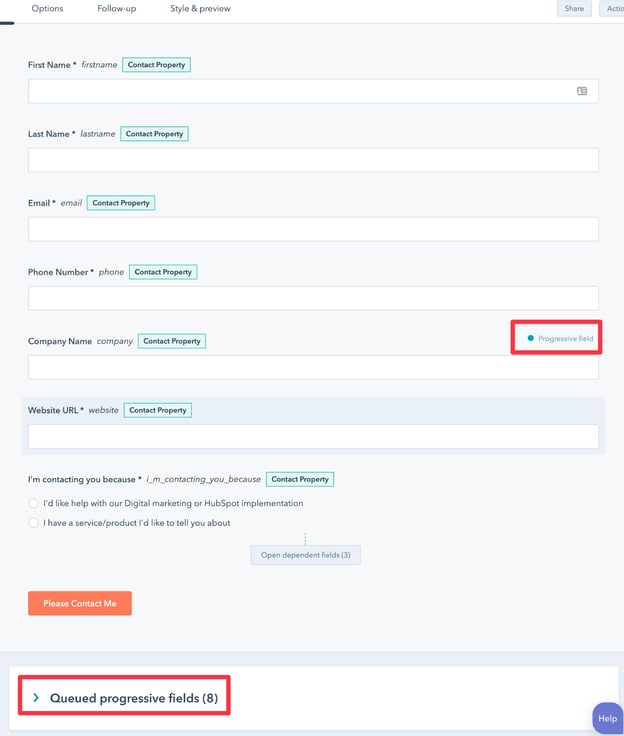
If the Company name field has been entered, the next time the form is shown to the contact it will switch in another field to replace the Company Name field.
It selects the next field to use from a queue of fields, set at the bottom of the form:
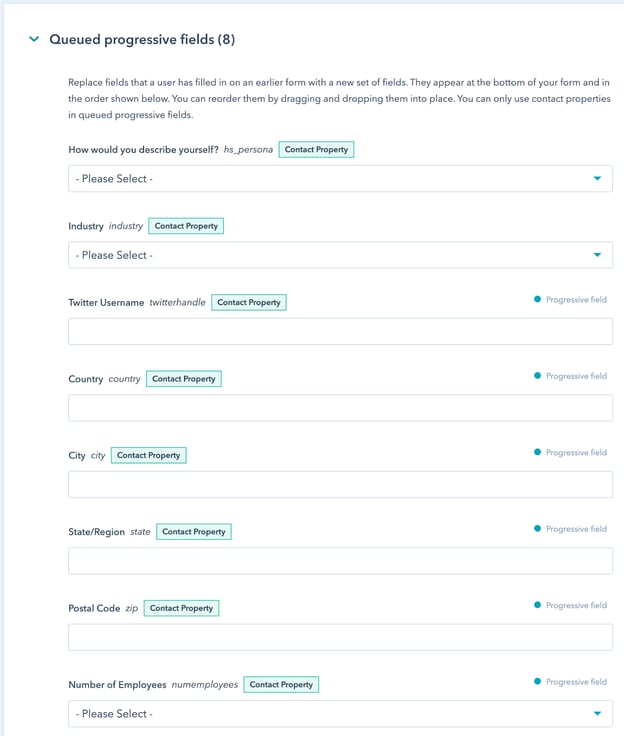
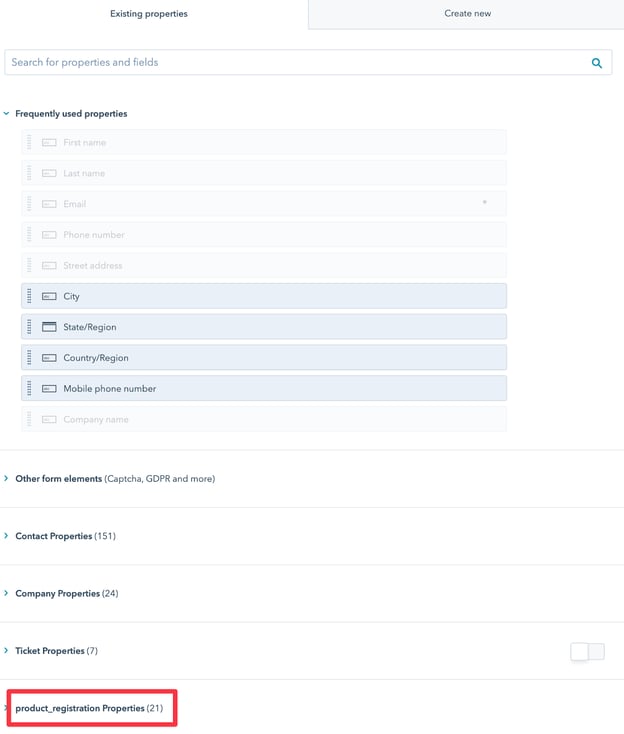
As well as contact properties you can also use properties from:
For example, here’s a Customer Registration form, which has a custom object (Product Registration) available in the fields to add to the form:
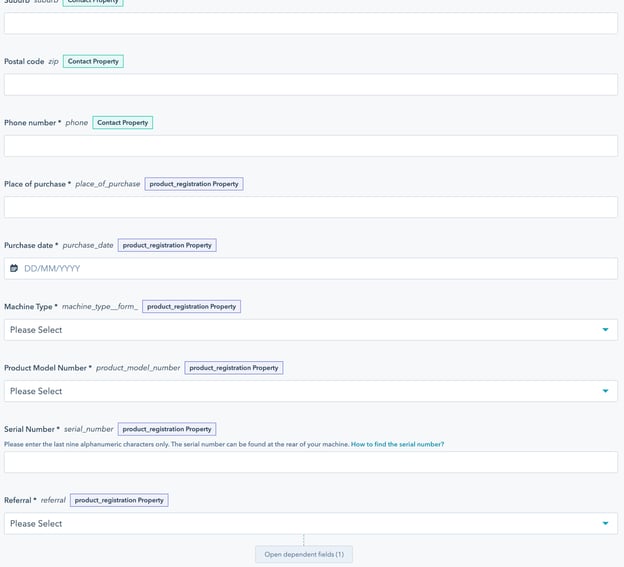
And here’s how it looks when custom object properties have been added:
There’s a number of options on forms:
The main options of interest are:
By popup forms we are referring to the following 4 form options in the create form process:
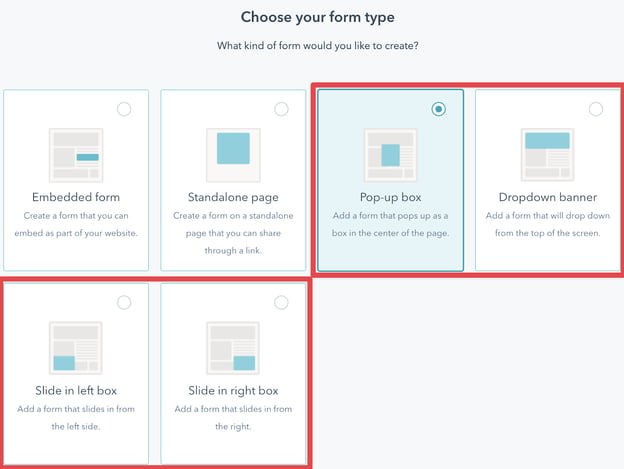
These include:
Some quick tips:
One potentially confusing (but super handy) option with HubSpot forms is to create forms that don’t actually have any fields to be submitted. Some would say that means it isn’t actually a form (and I get that) but put that aside for now.
Here’s a typical popup form (with fields):
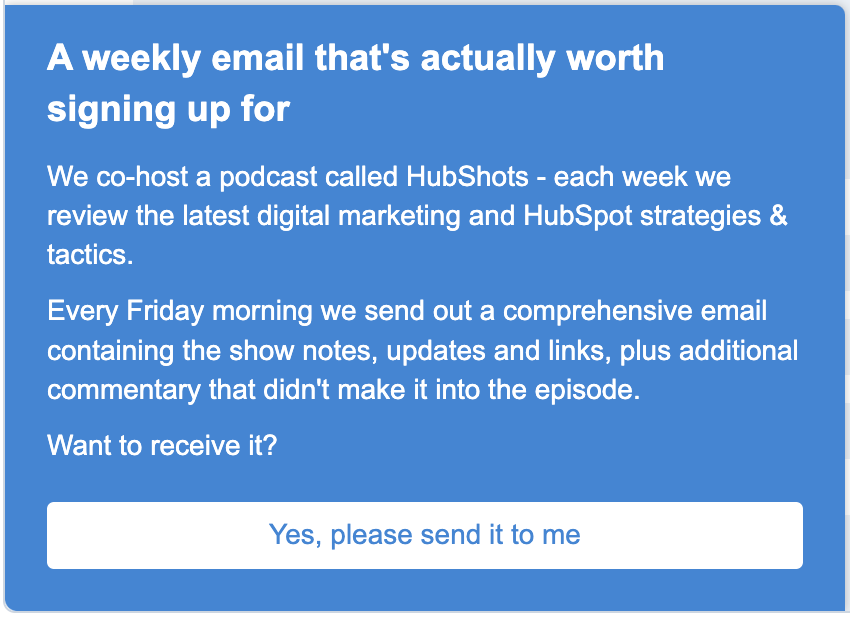
Clicking the button shows this form:
And here’s an example of a popup form (without fields):

Initially it seems the same as the earlier form.
The difference is that the ‘Learn More’ button doesn’t progress to showing a form. Instead it simply takes the visitor to another location (eg website page, meeting link, file, etc).
We call these ‘Click through forms’.
BTW if you are interested in seeing that click through form in action, you can view it on this page on the Louder Minds site (one of my wife’s sites).
These are easy to set up in the first tab of the popup form editing:
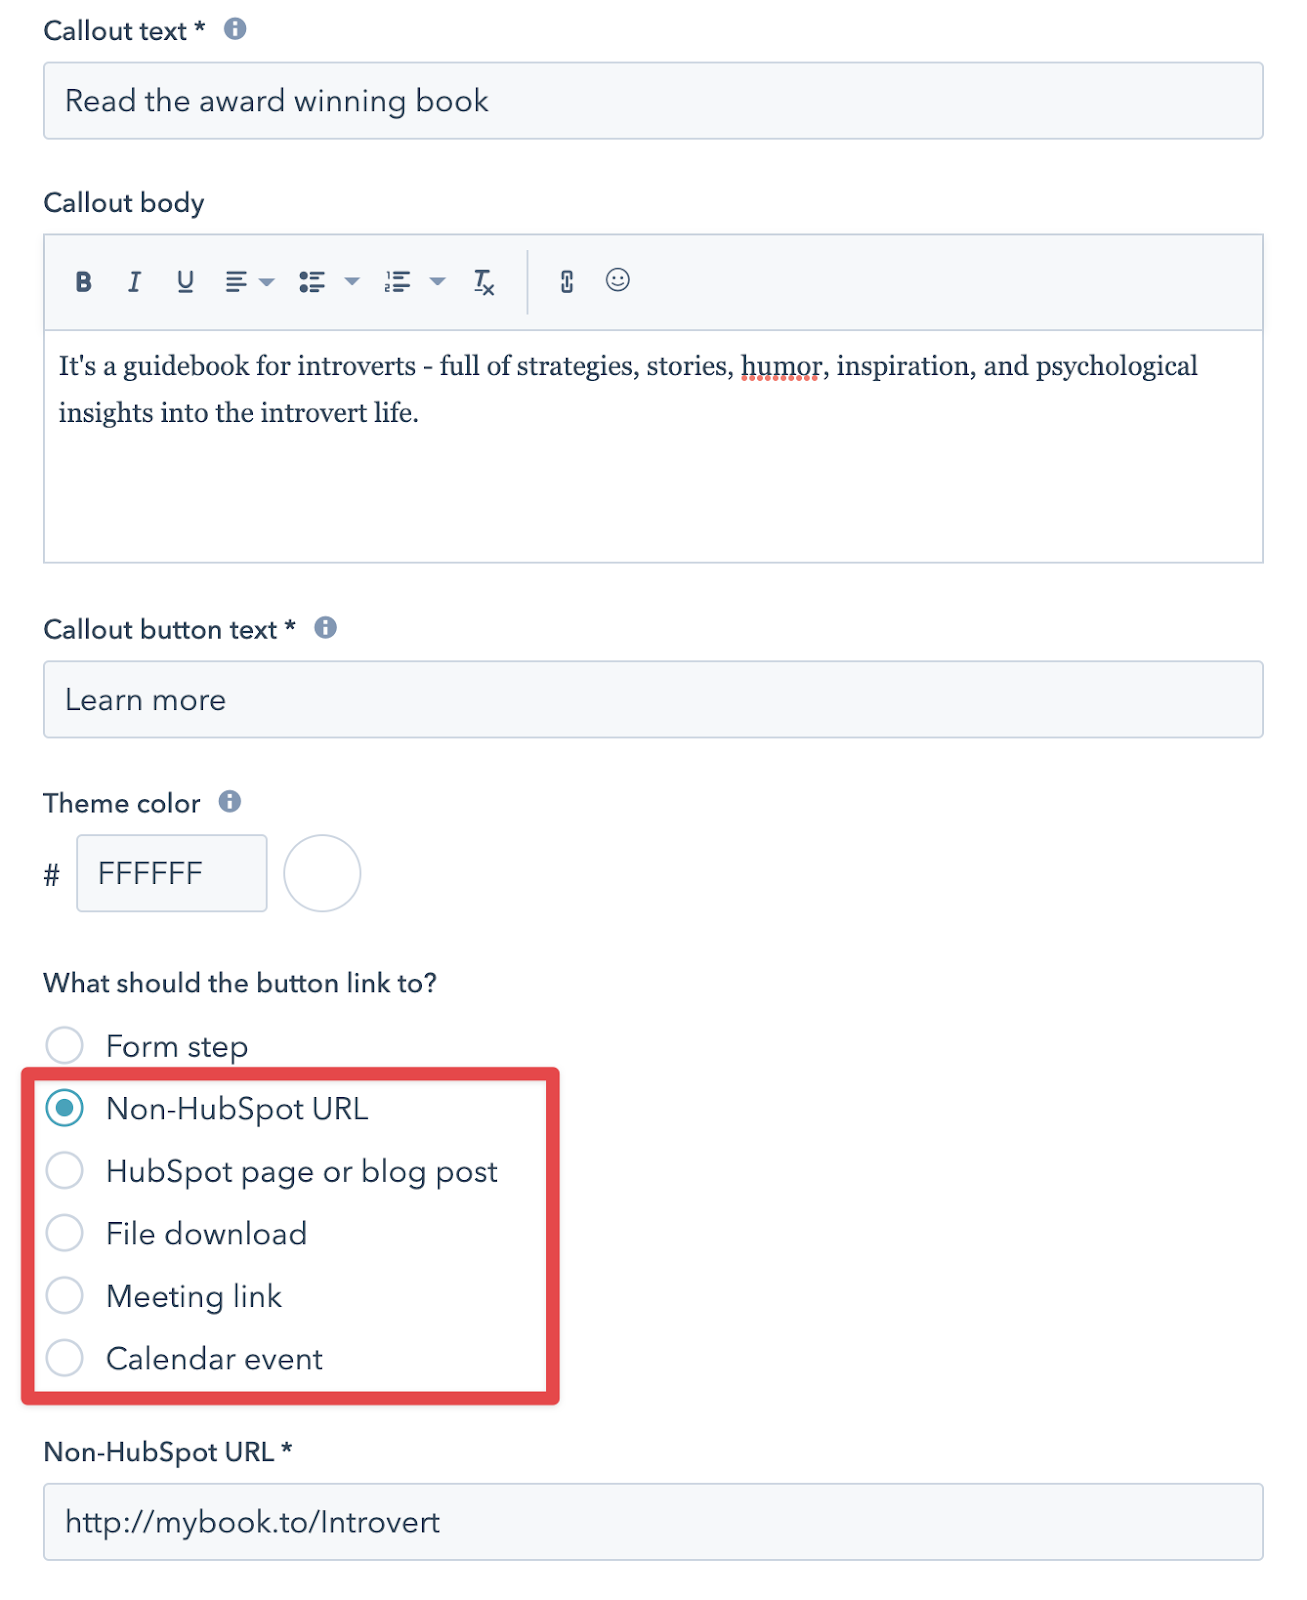
One of the super powerful features of popup forms is the Targeting functionality.
With Targeting of the form you can decide where and who sees the popup form.
Here’s an example of how we target the HubShots popup on our XEN site:
Things to notice:
This is really powerful - but is only the start.
You can also target based on things like query parameters - here’s an example of where we promoted a coupon code to an audience, but then hid the popup if they visited the site and used the coupon code (since it would be just promoting the very offer they had used):
There’s a range of other behaviours you can target, including:
You can get very creative with these options.
You can also ‘chain’ popups eg
Ok, so now you’ve put your form in action and are starting to get some results.
How do you measure results?
There’s a number of ways to view and analyse the results:
The Form Analyze tab is sometimes easy to miss - but it’s right there next to the Manage tab (ie that shows your list of forms):
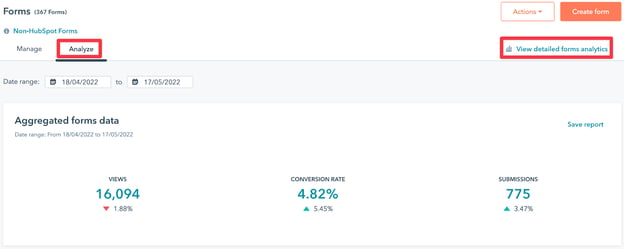
The Analyze tab shows the summary of all your forms, and allows you to review the conversion rates of forms:
You can sort by the columns as well (eg sort by Conversion rate)
What’s a Good Form Conversion rate?
Conversion rate will vary depending on the goal (quality versus quantity) of the form.
However, as a general guide, for top of the funnel, simpler forms you should be able to see >20% conversion rates if your audience is targeted and your offer is simple and compelling.
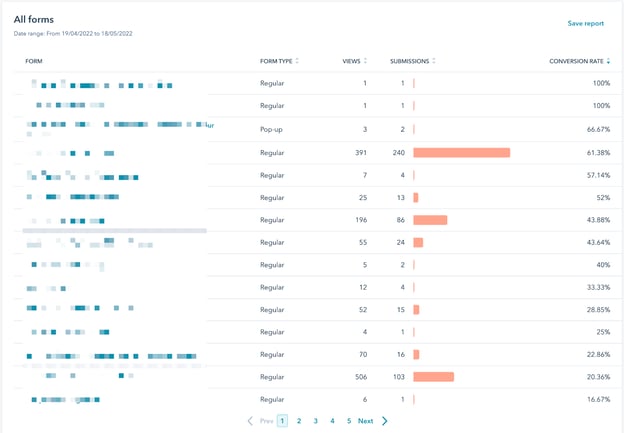
For bottom of the funnel, complex forms that are designed to only attract very qualified contacts we don’t really consider the conversion rate (instead we measure based on deals linked to the form submissions - more on that in a future episode).
At the top right of the Analyze tab there is a link to the detailed Form Analytics report
Form Analytics is very similar to Forms Analyze tab, but has two additional features you may find useful:
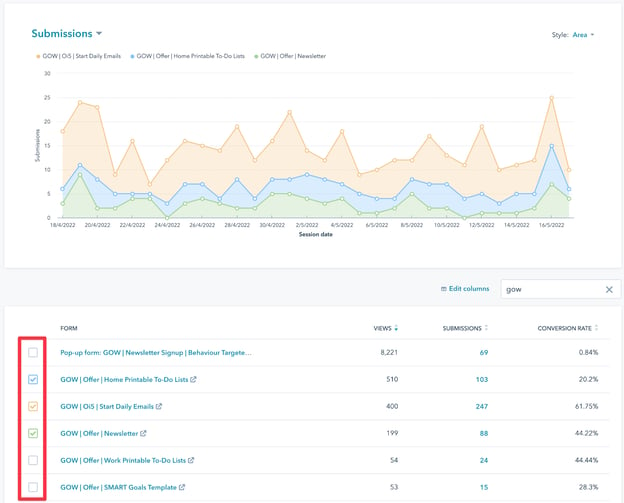
Lists are your friend. Repeat after me: Lists are your friend
We always create lists based on form submits, because they quickly show the results of each form:
You can add these to dashboards to get a good overview. Note that on collected forms the views and conversion rate metrics are not available.
Plus there are prebuilt reports that you can add from the library to start:
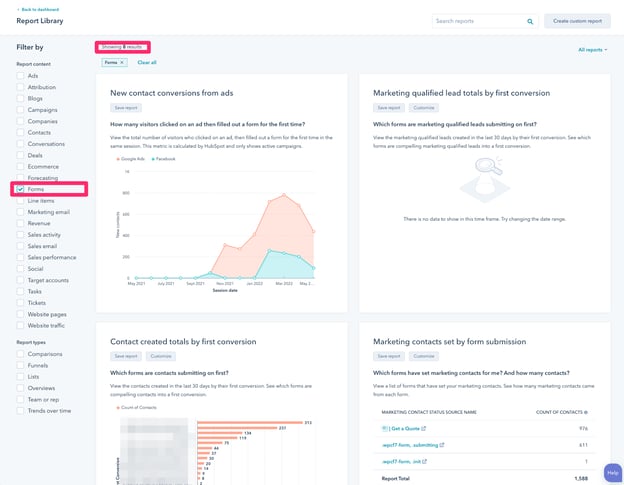

You can see below that the highlighted part is one of the best places to view and compare some key metrics. What is interesting below is that the forms are the same, but the offer was different on the forms!
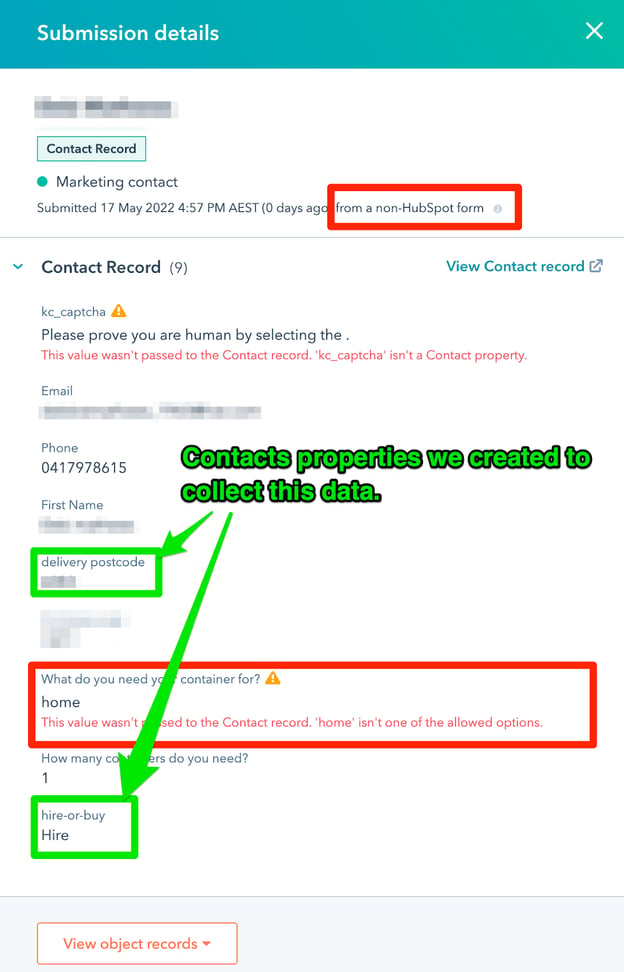
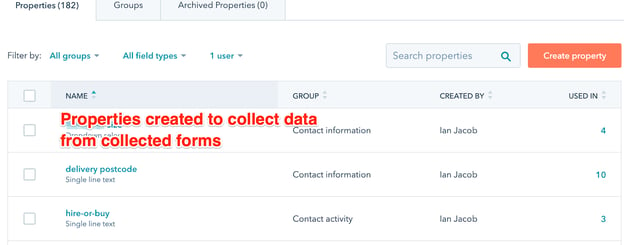
On collected form fields you will often find that data gets collected but the system cannot match the property and therefore cannot add it to the CRM.
Solution: View what form data is collected by Viewing an individual submission on the form submission page. Then create properties to match.
When you create forms in a growing portal it’s important to use a consistent and helpful naming convention. There’s no right or wrong, as it typically depends on the particulars of the business, however, here’s a few common descriptors to include:
Here’s some examples of how we name HubShots forms:
Notice the ‘XEN | HubShots Signup’ Form - it is to sign up for HubShots show notes, but is used on the XEN site. Hence, we prefix with the brand of the site it will show on, and then the rest is just the descriptor of what it is.
When creating this it is important to think about how you want to collect and use the data.
HubSpot recently added the ability to add a form as an asset in a HubSpot campaign:
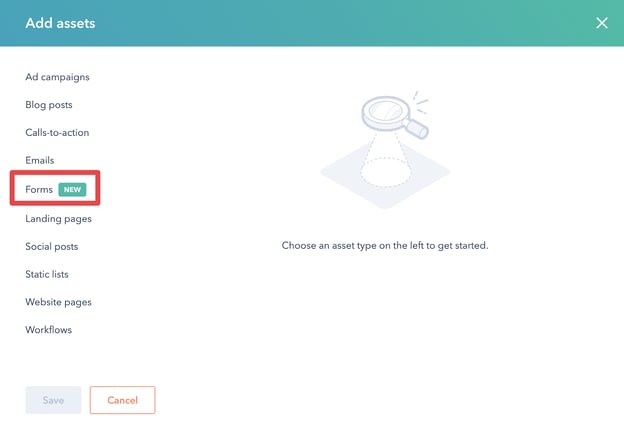
(You can also add to a campaign from the form Options on a specific form)
This is good for showing attribution of a form in a campaign.
However, don’t feel that it is mandatory to add a form to a campaign. Examples would be if a form is used globally throughout a site and potentially impacts multiple campaigns.
Since forms can only be associated with a single campaign, it doesn’t necessarily make sense to associate a global form with a specific campaign.
There’s two ways of approaching this:
It’s probably beyond the details of this episode, but as a quick note, we tend to create an overall campaign for anything that isn’t specific. For example we have a ‘HubShots’ campaign that we associate any assets that aren’t part of specific campaigns (Eg forms, social updates, general emails, etc)
These used to be known as Collected Forms and refer to forms that HubSpot ‘listens for’ on a website.
For example, a WordPress site that is using WordPress forms. (Assuming the HubSpot tracking code is in place on the site)
HubSpot can ‘listen for’ those WordPress forms to be submitted, and pull the form submission details through into HubSpot.
These show up in the Forms list as Non-HubSpot forms and are very handy.
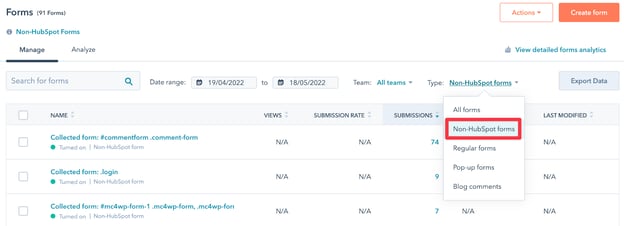
Typical form submits that get ‘collected’ include:
There’s a number of different WordPress form tools, with some of the most popular being:
We tend to use Gravity Forms on WordPress sites (if we’re not able to use HubSpot forms), due to the excellent integration it has with HubSpot. We use the Gravity Forms HubSpot Add-On.
We’ll be going through this in detail in our HubSpot Workflows episode in the coming weeks.
However, for now the main point to note is how easy it is to trigger Contact workflows based on a form submission:
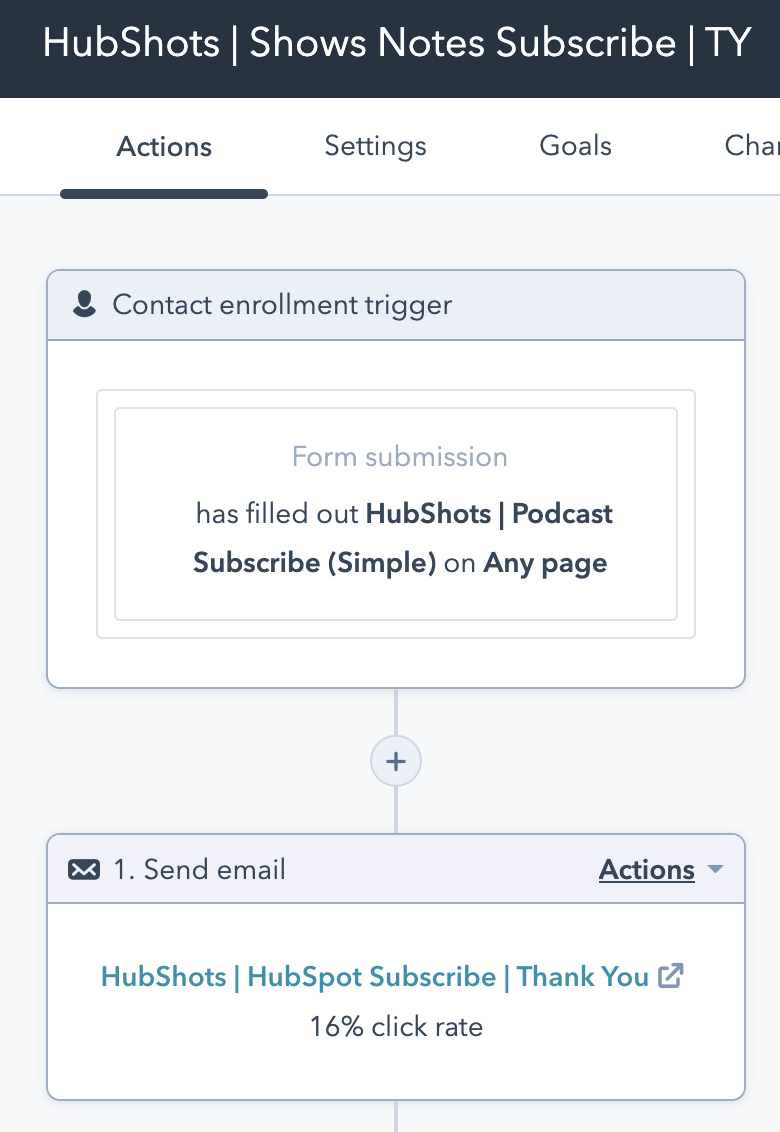
This is probably the simplest example of using a form submission to trigger a workflow.
Notice that the workflow triggers based on the form submit happening on Any page:
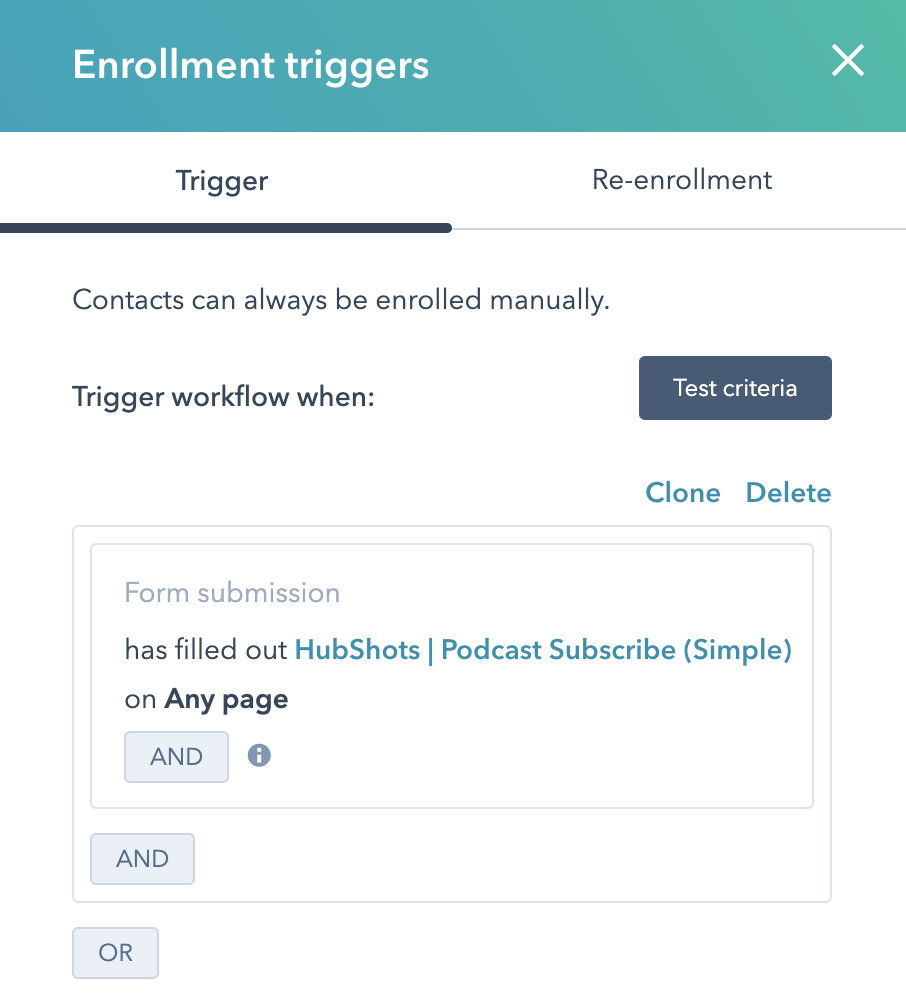
However, this can be refined if appropriate:
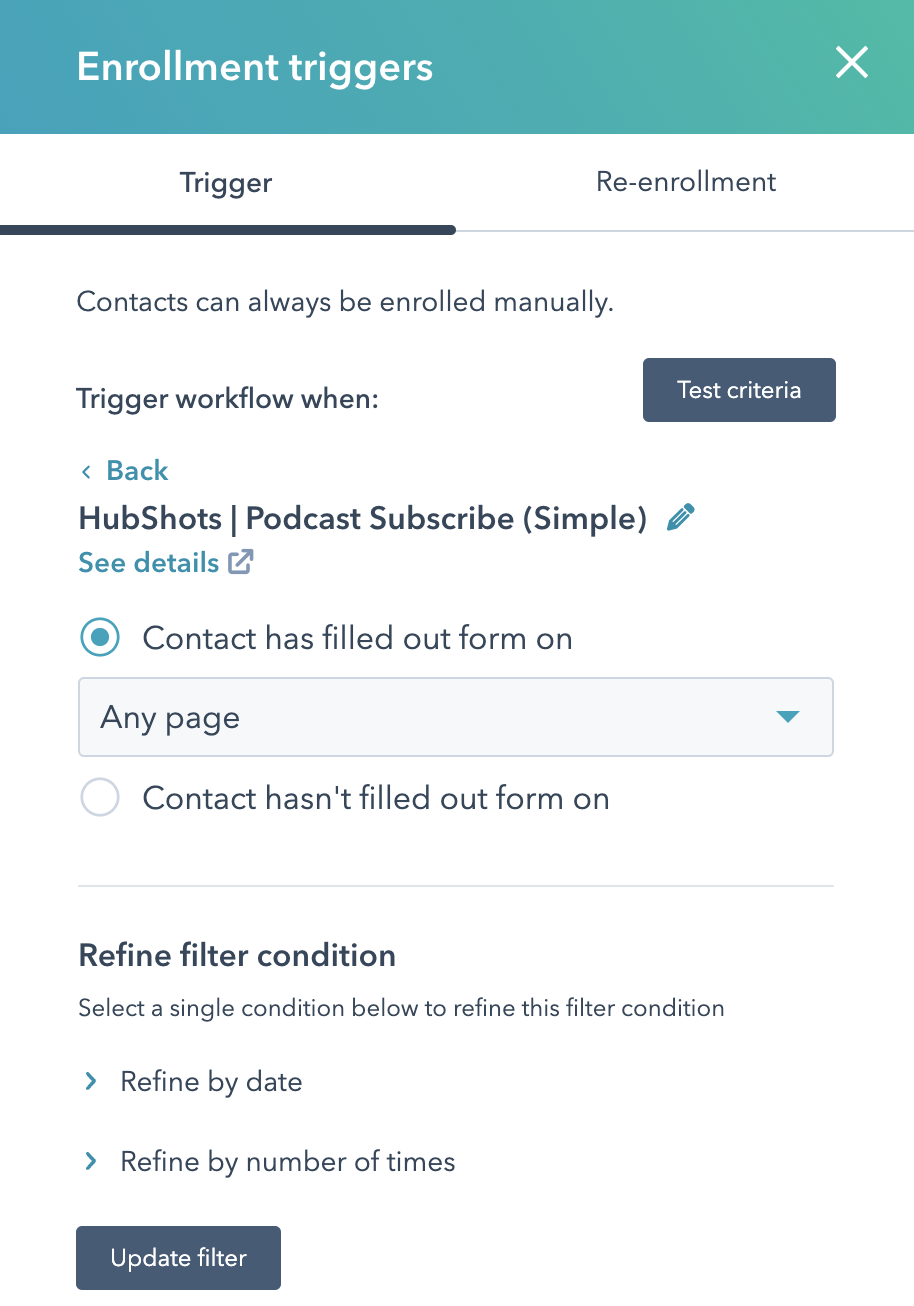
For example it could refined to:
Advanced: you can also use Lists (based on form submits) to trigger workflows:
This can have pros and cons and needs to be handled with care (see our discussion ‘Should I use Lists to Trigger Workflow’ of this from last episode.
“With data collection, ‘the sooner the better’ is always the best answer.” — Marissa Mayer
“Contact data ages like fish, not wine … it gets worse as it gets older, not better.” — Gregg Thaler
Connect with HubShots here:
Connect with Ian Jacob on LinkedIn and Craig Bailey on LinkedIn
HubShots, the podcast for marketing managers and sales professionals who use HubSpot, hosted by Ian Jacob from Search & Be Found and Craig Bailey from XEN Systems and XEN Solar.
HubShots is produced by Christopher Mottram from Podcastily.
Please share this with colleagues - it helps us improve and reach more marketers.

Welcome to HubShots Episode 280: HubSpot Lists Best Practices (for Building Marketing Campaigns) The Ultimate Guide to using HubSpot Lists This...
Welcome to HubShots Episode 285: HubSpot Form Options, Paid Channels Overreliance, Custom Report Builder This edition we dive into: Old school...
Welcome to HubShots Episode 289: Using Service Hub for Internal Business Processes This edition we dive into: Are Ticket pipelines the real...
